

About this time, every year, my heart starts to tire of the winter weather I cherish so much–I doubt there are many who appreciate snow as much as I do. It’s still a little early for starting seeds, at least here in USDA Plant Hardiness Zone 8a. Having grown in zones 8b & 5-6, we are very excited to see what this new zone has in store for us.
Over the past few weeks, our mailbox has been filling up with a delightful assortment of seed catalogs. They are always so much fun to look through. My favorites are Territorial Seeds and Baker Creek Seeds. The Baker Creek Catalog is gorgeous and is more like a coffee table book.
If by chance you are ready for spring, over the next few weeks, we will be giving you some tips to get your 2017 garden off to a great start! And, we have some exciting news (and a freebie!) that we will be sharing with you at the end of this post!!
This week – Starting seeds.
When I say starting, I mean starting INDOORS. It’s still a bit too early in much of the country, even if you could break the frozen tundra with your garden spade, to even begin planting outdoors. Starting seeds indoors is simple and you don’t need a lot of fancy equipment or even a greenhouse.
I like starting my seeds in empty egg cartons, using the empty egg shells as a sort of pot. The egg shells can be planted along with the mature seedling and will break down, providing much-needed nutrients to your plant.
To start seeds in on egg carton you will need:
- An egg carton
- 12 egg shell halves
- Potting soil
- And a sharp object to poke holes
- Seeds!
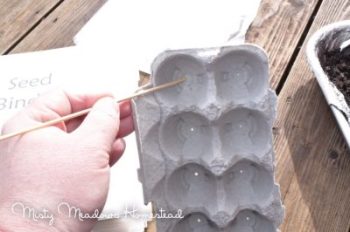
The first thing I do is pull out my “Seed Binder” – yes, seed binder. I find this helps me keep my seeds better organized. Everyone organizes their seeds differently and you will find what works out best for you. The inserts are actually made to hold baseball cards! Folded over, the seed packets fit nicely in the pockets.


Next, make sure your eggshells are clean and dry. Microwaving them for a minute or two will get rid of any bad pathogens
Cut off the lid of the egg carton and set it aside. You can use it later to start additional seedlings.
Take a sharp object, like a nail or toothpick, and poke a hole in each section and in the bottom of each egg to help with water drainage.

Place eggshells back in the carton and fill each eggshell with soil.


Make a slight indentation in the soil of each egg, lay a couple of seeds in the divot you created and cover lightly with soil.


Water your eggshells well, making sure the soil is damp.
Cover with plastic. A couple of years ago, I bought some clear bread bags; they aren’t really long enough for the bread I make but they are perfect for this! The bag helps retain both moisture and warmth, creating a mini greenhouse.

Place the egg carton in a warm, sunny windowsill. You can see in the picture above that condensation is already forming. That’s a good sign!
The seed packet should tell you how long it will take for those seeds to germinate. It’s usually anywhere from 7-21 days. So, sit back, and wait.
Don’t forget to lightly water your seedlings about every 2 days or sooner if you see them drying out. I like using a small spray bottle. Don’t drown them, just mist.
Once your seedlings emerge from the soil, they will need light. Many people place their seeds in a very sunny window. Usually, a south facing window will receive the most light. Unfortunately, here in the Pacific Northwest, we need to supplement with a grow light. We will talk about that next time.
While you’re waiting for your seedlings to emerge, you should start thinking about a couple of things:
Re-potting: When a seed first emerges from the soil, it has a set of two round leaves. These leaves are called cotyledons, which are part of the seed and act as it’s food source. As the seedling grows, it will form two more leaves that look more like what the plant’s true leaves look like. When this happens, the plant begins photosynthesizing, receiving energy through that process.
Transplanting outdoors: After the threat of frost has passed, you can remove the seedling and shell from the carton or from its pot if you have repotted and plant in your garden.
We will be going into more depth about these topics in the weeks to come – so, come back and visit us!
Now for the exciting news! With you in mind, we have created an amazing tool – the 2017 Printable “My Garden Planner”!! This planner will fit nicely in a binder and will help you stay organized, helping you have a much better garden experience–you will refer to this journal year after year and throughout the growing season(s). You’ll find very helpful logs, planners, charts and tips inside.
We have THREE versions available:
 Extreme Printable 2017 Garden Journal (30+pages!)
This 30+page Journal has been designed for the more experienced gardener or the beginner who is ready to jump in feet first. The PDF will print out landscape (11″x8.5″) and fits nicely in a standard 3-ring binder.
 Extreme MINI Printable “My Garden Journal” – 5.5″ x 8.5″ – Mini Binder Half Sheet Size
NEW!! This is our Extreme MINI Printable “My Garden Journal” – the 15+page PDF will print out on an 8 ½” x 11″ sheet of paper. It has been designed to be printed out, cut in half (giving you 30+pages), and hole punched to fit the 5 ½” x 8 ½” mini binder. Due to its small size, this version does not have the helpful tips.
 LITE Version Printable 2017 Garden Journal (10 pages!)
This 10-page Journal has been designed for a beginning gardener or a weekend gardener. The PDF will print out landscape (11″x8.5″) and fits nicely in a standard 3-ring binder.
These AMAZING bundles includes (*indicates what is in the LITE version)
- Cover Page*
- Table of Contents*
- General Garden Information *
- Weekly Planner
- Monthly Calendar *
- Seasonal Garden Chores
- Garden Projects
- Daily Weather Observations
- Monthly Weather Observations *
- Spring Garden Plot Sketch *
- Fall Garden Plot Sketch
- Square Foot Gardening Sketch
- Seed Inventory
- Seeds to Purchase *
- Soil and Amendments *
- Individual Plant Profile
- Seedlings Started *
- Succession Planting Chart
- Rainfall & Irrigation *
- Pest & Disease Treatment *
- Transplant & Direct Sow
- Companion Planting
- Season’s Harvest *
- Harvest Preservation*
- Crop RoRotationlan
- Seed Saving
- Seed Saving Packets
- Seed Saving Test
They are available in our Etsy Shop AND the EXTREME versions are on sale through the end of February!!! Use Code: 2017FebWP at checkout
Finally, Mr. Misty and I would like to offer you our “Seedlings Started” page as our gift to help you get started on your gardening journey!!

Click here to download your copy today!
Have you started seeds before? Have any tips? Leave them in the comments below.

![]()
This post was shared on The Homesteader Hop
If you like this post, please feel free to share and please click the follow button on the side or return to Misty Meadows Homestead to follow our adventures… Oh! Wait! Before you go – don’t forget to subscribe to our YouTube channel! Thanks!
Content and Photos by Misty Meadows Homestead and S.Lago © All Rights Reserved

I’m so thankful for a dear friend who caught a major blog malfunction. Somehow two blog edits got merged… pictures got un-resized… duplicate words, sentences. It was a MESS!! It should be fixed now. Karen, thank you!!
LikeLike
Such a cute project! Would it be OK to reblog it?
LikeLiked by 1 person
Of course! I would be honored
LikeLiked by 1 person
Reblogged this on Suzanne's Mom's Blog and commented:
Here’s a bonus post for you, Dear Reader, from blogger Misty Meadows. Good timing as the snow melts and you think about starting your garden. Love, SuzannesMom
LikeLiked by 1 person
Is it very important to use the egg shells or does it work to plant straight into the egg cartons? We have loads of egg cartons but I didn’t think to save any shells. Good luck with your seedlings! 🙂
LikeLiked by 1 person
Absolutely! It will work perfectly without the eggshells. AND, the cool thing, the carton with get moist enough that you can carefully cutout the cells and plant them in the ground where they will eventually become part of the soil! Let me know how it goes for you! Happy gardening!
LikeLiked by 1 person
Awesome, I will give it a shot. Thanks! 🙂
LikeLiked by 1 person
Cool! Let me know how it works.
LikeLiked by 1 person
So cute. I like the binder idea. I can’t wait to try this…maybe next year though as our summers are currrently spent between two homes and it make this difficult!
LikeLike
Found you on the Homesteader Hop. This is a great tutorial, I would have never thought of putting drainage holes in the eggshells! I love your seed-binder too, might have to borrow that idea! Thank you!
Love, Christianne
LikeLiked by 1 person
thank for stopping by! It means the world to me! Let me know how it works out for you!
LikeLike
What an interesting blog post, especially now that my mind is starting to think of my garden back in Ireland. When we get back there beginning of April it will be high time to start sowing 🙂 thanks for such useful information.
LikeLike
Hi Misty, I nominated you for the Versatile Blogger Award. You can choose not to participate if you do not want to. The details are on my page http://www.combingthecatacombs.wordpress.com
I tried to put your link on my page and it did not work, but I hope you read this. I had to nominate 15 people and really didn’t know what I was doing. I love your blog, I haven’t been keeping up, because I have a lot going on, I had this award to do, and am also in a writing group. I will catch up, as soon as I finish up all mt other projects. Thanks Kathy.
LikeLiked by 1 person
I am so sorry! I only saw this today and I feel really bad for not responding sooner. Thank you so much for the nomination! What an honor! I’ll work on this, this weekend. ❤️
LikeLiked by 1 person
For some reason it’s not allowing me to access your site
LikeLike
Actually, it’s my fault, I was supposed to let you know and I missed sending you the message. It’s strictly voluntary, if you don’t want to do it, that is okay., but I will be looking forward to it. A lot of people don’t want to do them.You deserve it. I like your blog a lot, so I thought of you, even though I haven’t visited lately. I will get there soon, been really busy.
LikeLiked by 1 person
THANKS!!
LikeLike